3 April 2025 Gabriele Malacasa
Journal of Experiences
How to identify and filter Cookiebot traffic in GA4 to get more accurate data on real online user behavior.

Consent management and privacy protection are key priorities for those who operate online today. And it’s not just about compliance with regulations like GDPR and CCPA, but about respecting and protecting people who navigate the web, with their rights and their legitimate expectations of transparency. In this context, Consent Management Platforms (CMPs) like Cookiebot are valuable allies on this path towards a more transparent and respectful browsing experience.
However, Cookiebot’s monthly scanning activity, while essential for monitoring and categorizing cookies, can generate significant traffic that risks distorting our understanding of how people actually interact with the site.
For this reason, it is essential to implement filtering strategies that allow us to distinguish automated traffic from human traffic. Only in this way will we be able to truly listen to and understand the authentic behavior of visitors, their choices and their navigation paths, obtaining through Google Analytics 4 a genuine and significant vision of how people experience our website.
How do I know if I’m recording Cookiebot traffic?
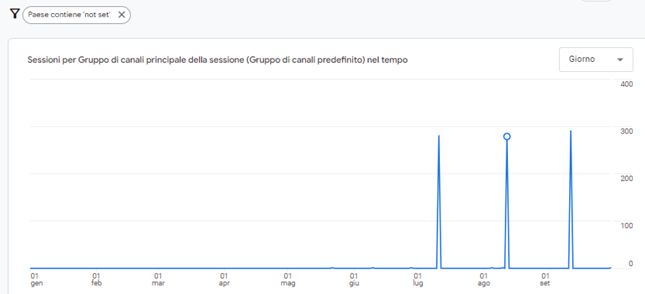
As with many other bots, Cookiebot traffic typically manifests itself through sudden increases in sessions in the Direct channel. A first analysis can be done simply by consulting the “Traffic Acquisition” report in Google Analytics.
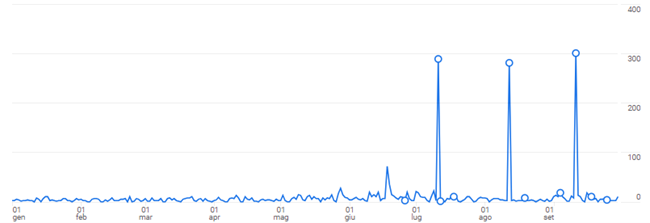
For a more accurate check, you can apply specific filters. In particular, after selecting the Direct channel, you can further filter to display only traffic with the value “(not set)” in the “Country” dimension.
It is important to note that these characteristics may change over time. In 2023, for example, Cookiebot traffic was recorded as originating from Dublin, Ireland. This highlights the importance of constant monitoring and a flexible approach in identifying this type of traffic.
How to Create a Cookiebot Traffic Filter on GA4
In order to filter the traffic of these periodic scans, you must first identify it.
This Cookiebot support article offers two options for identifying scanner visits: one by IP addresses, and the other by User Agent.
Regarding this last option, by carrying out some tests, we tried to record this variable on GA4 and, differently from what is written in the article, the wording “Cookiebot” is not actually present in the User Agent of this bot traffic, therefore to date it cannot be used as a filter discriminant.

However, it is possible to use the list of IPs from which all scans start: in the GA4 settings, in fact, it is possible to mark the traffic of one or more IP addresses by assigning them a parameter called “traffic_type”, following the steps below:
1 – Once logged in to Google Analytics, click on the gear icon at the bottom left to access the administration
2 – Click on the “Data collection and modification” item in the left menu, in the secondary menu that opens click on “Data stream”
3 – Click on the data stream from which Cookiebot traffic is recorded
4 – In the “Google Tag” section of the stream details, click “Configure tag settings”
5 – In the window that opens, click on “Show more” at the bottom and then on “Define internal traffic”
6 – Click on the “Create” button at the top right, then enter a name for the rule (e.g. “Cookiebot Traffic”) and the value of “traffic_type” (e.g. “cookiebot_traffic”).
In “IP Addresses” you can instead choose “The IP address is equal to” as the match and paste one of the IP addresses from the Cookiebot support article in the right field, repeating the same operation for all IPs by clicking on “Add condition”, but this operation would be quite long, especially if repeated for different GA4 properties.
It is more convenient to select “IP address matches regular expression” and in the value field insert a regex that collects all the IP addresses, taking care to insert the “\” symbol before each dot, which ensures that the dot is recognized as a punctuation mark and not as a special character.
For example, for a list of IPs like the following:
20.223.9.138
35.198.160.49
34.159.168.195
35.246.191.14
34.107.102.47
34.141.10.24
35.246.143.2
34.159.247.222
35.198.137.6
34.159.86.126
35.198.78.207
You can use the following regex:
20\.223\.9\.138|35\.198\.160\.49|34\.159\.168\.195|35\.246\.191\.14|34\.107\.102\.47|34\.141\.10\.24|35\.246\.143\.2|34\.159\.247\.222|35\.198\.137\.6|34\.159\.86\.126|35\.198\.78\.207
This way, you only need to copy a single line of text into each property where you need to filter Cookiebot traffic.
By doing this, the traffic recorded by Cookiebot scans will be marked with the “traffic_type” value entered in the settings and, thanks to this value, it will be possible to use a filter to avoid it being recorded, like this:
1 – Still within Google Analytics, click on the gear icon at the bottom left to access the administration
2 – Click on the “Data collection and editing” item in the left menu, in the secondary menu that opens click on “Data filters”, then click on “Create filter” at the top right
3 – Select “Internal traffic” as the filter type, then enter a name for the data filter (e.g. “Cookiebot traffic”), leave “Exclude” as the value for “Filter action” and as the name of the “traffic_type” parameter enter the value that was set in the previous steps for defining internal traffic (in our example case it was “cookiebot_traffic”)
4 – Set the filter status to “Active” and click on “Create” at the top right, confirming a second time in the window that will appear
From this moment on, Cookiebot traffic will no longer be recorded on the property (this is not retroactive, and historical data will not be cleaned if such traffic was recorded previously).
A possible flaw of this solution is that, as written in the article, the list of IPs is subject to changes and updates over time, and in turn will also have to be updated in the settings of each GA4 property for which we want the filter to be active.
A possible solution is to be able to “follow” the article by clicking on the “Follow” button at the top, after creating an account on the Cookiebot support site. This will send an email to the address used for registration every time the article is updated, but you will still need to create a new regex that takes into account the new IP addresses.
To automate this process as much as possible, a Python script is provided to periodically check the article and, if any changes are found since the last check, produce a regex that includes all the new IP addresses to copy and paste into the GA4 settings and then send it to an email address of our choice, as if it were a notification.
Automate Cookiebot IP Address Checking with Python
To get started, you need to install Python on your computer. Next, it is advisable to create a virtual environment: this will allow you to have an isolated installation of Python that will include only the libraries necessary for the desired script to run.
Alternatively, you can use Anaconda, an open source distribution that includes Python and R. Anaconda offers a more intuitive and simple management of packages and virtual environments. To create an environment with Anaconda, you need to open Anaconda Navigator, click on “Environments”, select “Create”, give the environment a name and finally click on the newly created environment to activate it.
The last preliminary step consists in installing two fundamental libraries: Selenium, which allows you to automate interactions with the browser, and BeautifulSoup, which allows you to extract specific information from web pages. To install these libraries, simply use the following commands in the command prompt or terminal.
On Windows:
py -m pip install selenium beautifulsoup4
On macOS/Linux:
python3 -m pip install selenium beautifulsoup4
Below is the Python script:
from selenium import webdriver

from bs4 import BeautifulSoup

import smtplib, json

from email.mime.text import MIMEText

from email.mime.multipart import MIMEMultipart


def send_email(subject, body):

    # Configure SMTP server information

    smtp_server = 'smtp.gmail.com'

    smtp_port = 465

    with open('secrets.json', 'r') as file:

        secrets = json.load(file)

    from_email = secrets["address"]

    password = secrets["password"]

    if ", " in secrets["receivers"]:

        to_email = secrets["receivers"].split(", ")

    else:

        to_email = secrets["receivers"]


    # Create the email message

    msg = MIMEMultipart()

    msg['From'] = from_email

    if ", " in secrets["receivers"]:

        msg['To'] = ", ".join(to_email)

    else:

        msg['To'] = to_email

    msg['Subject'] = subject


    # Add message body

    msg.attach(MIMEText(body, 'html'))


    try:

        # Connect to SMTP server and send email

        with smtplib.SMTP_SSL(smtp_server, smtp_port) as server:

            server.login(from_email, password)

            server.sendmail(from_email, to_email, msg.as_string())

    except Exception as e:

        print(f"Error sending email: {e}")


#opens Cookiebot's website page for scraping

url = "https://support.cookiebot.com/hc/en-us/articles/360003824153-Whitelisting-the-Cookiebot-scanner"


driver = webdriver.Chrome()


driver.get(url)


soup = BeautifulSoup(driver.page_source, 'html.parser')


driver.close()


article_body = soup.find("div", class_='article-body')


ul = article_body.findChild("ul", recursive=False)


li_items = ul.find_all('li')


#create the regex that includes the ip addresses found in the page

ip_regex_list = ""


for li in li_items:

    ip_regex = li.text.replace(".", "\.") + "|"

    ip_regex_list = ip_regex_list + ip_regex


ip_regex_list = ip_regex_list[:-1]


# message body


with open('secrets.json', 'r') as file:

    secrets = json.load(file)

sites_list_link = secrets["sites_list_link"]


subject = 'Cookiebot's IP address list has changed'

body = """

Hello,

<br><br>

I ran a scan of Cookiebot's IP list and found some new IP addresses!
Below you can find the regex that includes all the current CookieBot IP addresses:

<br><br>

""" + ip_regex_list + """

<br><br>

Click <a href="

""" + sites_list_link + """

">HERE</a> to see a list of your sites using Cookiebot.

<br><br>

See you next update!"""


try:

    f = open("last_ip_regex.txt", "r+")

    if f.read() != ip_regex_list:

        f.seek(0)

        f.write(ip_regex_list)

        f.truncate()

        f.close()

        send_email(subject, body)

    else:

        pass

except FileNotFoundError:

    f = open("last_ip_regex.txt", "w")

    f.write(ip_regex_list)

    f.close()

    send_email(subject, body)
This script will be accompanied by a file in JSON format that will be called “secrets.json” and placed in the same folder where the Python script is present. This file must be structured in the following way:
{

"address": "sender.address@gmail.com",

"password": "xxxx xxxx xxxx xxxx",

"receivers": "receiver.address.1@example.it, receiver.address.2@example.it",

"sites_list_link": "https://docs.google.com/spreadsheets/d/xxxxxxxxx"

}
Below is an explanation of the four values in the file:
- “address”: this is the address of the sender of the email. It has to be a Gmail email address, it can be fine even that of an account created especially for this script
- “password“: this is not the password usually used to access the sender’s email address, but a 16-digit password that is necessary for this type of script to work. To create it, you need to go to the settings of the sender’s email address and activate two-step verification, following this link. You need to enter a name for the app in the appropriate field (e.g. “Checker IP Cookiebot”), then you need to click on “Create” and copy the 16-digit password that will appear
- “receivers“: here you should enter a list of the various email addresses to which you want the notification email to be sent. The addresses should be separated by a comma and a space
- “sites_list_link“: in this field you should insert a link to a Google Sheets sheet, prepared by us, very useful when managing more than one site because in the sheet you can insert for each site the link to the GA4 data stream settings page, in order to speed up the IP update process. Keep in mind that in the Sheet sharing settings you should authorize the email addresses of the profiles that will need to see it, so that they can access it and update it if necessary.
To ensure that the script is activated regularly, you can use a service like Windows Task Scheduler, which allows you to activate processes based on customizable rules, while the equivalent that can be used on Mac is Automator. For example, if we wanted to activate the script every time we log in to the profile of a Windows PC, we can follow these instructions:
1 – Find the “Task Scheduler” program, open it and in the top menu select “Action” and “Create task”
2 – In the “General” tab enter a name (e.g. “Cookiebiot IP Checker”) and select “Run only if user is logged in”
3 – In the “Activation” tab click on “New” and in the drop-down menu at the top select “On login”, also selecting the option “Delay activity for 1 minute”
4 – In the “Actions” tab, click on “New” and in the “Program or script” field you need to enter the path to the Python .exe file. You can find it by entering the command “where python” in the Windows Command Prompt, and it is usually a path like “C:\Users\user_name\AppData\Local\Microsoft\WindowsApps\python.exe”. If you have created a virtual environment, you will need to use the python.exe file in the environment folder (if you have used Anaconda, it is a path similar to the following: “C:\Users\user_name\Anaconda3\envs\my_environment\python.exe”)
Still in the same tab, in the field to the right of “Add arguments” you need to enter the name of the script including the extension (e.g. “my_script.py”) and in the “Start” field you need to enter the path of the folder where the script is contained (e.g. “C:\Users\user_name\script_folder”)
5 – Finish by clicking on “Ok”
This will check the Cookiebot support article every time you log into your PC profile, looking for updates in the IP address list. If the list has changed, you will receive a notification email containing the regex to use to update the filter on GA4.
Related articles:
TAG:
digital marketing